Extended Side Angle Pose (Utthita Parsvakonasana): A Complete Guide to Practice and Perfection
The Extended Side Angle Pose (Utthita Parsvakonasana) is a powerful and versatile yoga pose that strengthens the legs, stretches the sides of the body, and improves stability and balance. This guide will provide you with detailed steps to master the pose, highlight key precautions, and explore how to integrate breathing and mindfulness to enhance your practice.
Step-by-Step Guide to Extended Side Angle Pose
Preparation
-
Begin in Mountain Pose (Tadasana): Stand tall with feet together, arms by your sides, and spine elongated.
-
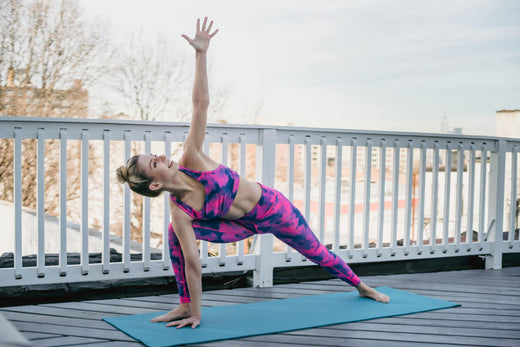
Transition to Warrior II: Step your feet wide apart (about one leg’s length). Turn your front foot outward 90 degrees and your back foot slightly inward at a 45-degree angle. Align your front heel with the arch of your back foot.

Entering the Pose
-
Bend your front knee until it aligns directly above your ankle, forming a 90-degree angle. Ensure your back leg is straight and strong.
-
Inhale and extend your arms parallel to the floor, palms facing down. Keep your shoulders relaxed and chest open.
-
Exhale and lower your front hand to the outside of your front foot, placing it on the floor or a yoga block. Alternatively, rest your forearm on your front thigh for more support.
-
Stretch your back arm upward toward the ceiling, creating a straight line from your raised hand to your grounded foot.
-
Turn your head to look at your raised hand, or keep your gaze forward if your neck feels strained.
Aligning the Body
-
Elongate your spine and ensure your torso twists slightly upward, opening your chest.
-
Keep your back leg engaged, pressing firmly into the outer edge of your back foot for stability.
-
Avoid collapsing into the front hip; instead, use your core to maintain a lifted and active posture.
Holding the Pose
-
Breathe deeply and steadily, holding the pose for 5–10 breaths or up to 30 seconds.
-
To exit, inhale and lift your torso back to Warrior II, then repeat on the other side.
Key Precautions and Common Mistakes to Avoid
-
Keep the Front Knee Aligned
-
Ensure your front knee stays directly above your ankle to avoid putting unnecessary strain on the joint.
-
Avoid letting the knee collapse inward; keep it aligned with your second toe.
-
-
Maintain Hips and Chest Alignment
-
Your hips should face forward, and your chest should rotate slightly upward. Avoid allowing the torso to collapse or twist excessively.
-
Engage your core to support this alignment and prevent pressure on the lower back.
-
-
Adjust Hand Placement
-
If your hand cannot comfortably reach the floor, use a yoga block for support. This modification ensures proper alignment without compromising the stretch.
-
-
Avoid Overextending the Neck
-
If looking upward strains your neck, keep your gaze forward or downward to maintain comfort and safety.
-
-
Distribute Weight Evenly
-
Press firmly into both feet, especially the outer edge of your back foot, to stabilize the pose. Avoid letting the front leg bear all the weight.
-

Breathing and Mindfulness in Extended Side Angle Pose
1. Synchronize Breath with Movement
-
Inhale: Focus on elongating your spine and expanding your chest.
-
Exhale: Deepen the stretch, grounding your hand and engaging your core.
2. Practice Diaphragmatic Breathing
-
Use belly breathing to enhance relaxation and balance:
-
Inhale deeply, allowing your belly to expand fully.
-
Exhale slowly, drawing your navel toward your spine.
-
-
This technique helps maintain stability and prevents overexertion.
3. Cultivate Mindfulness
-
As you hold the pose, direct your attention to the sensations in your body. Notice the stretch along your sides, the grounding of your feet, and the engagement of your legs.
-
Repeat a simple affirmation like “I am strong and balanced” to stay focused and centered.
Benefits of Extended Side Angle Pose
-
Strengthens Legs and Core: Builds endurance and stability by engaging multiple muscle groups.
-
Improves Flexibility: Stretches the hips, groin, and sides of the body, enhancing overall mobility.
-
Boosts Balance and Stability: Challenges your body’s coordination, improving both physical and mental equilibrium.
-
Encourages Deep Breathing: Opens the chest and lungs, promoting better oxygen flow and relaxation.
Final Thoughts
Extended Side Angle Pose (Utthita Parsvakonasana) is a dynamic and rewarding pose that combines strength, flexibility, and mindfulness. By focusing on proper alignment, breath control, and steady progress, you can unlock its full benefits and elevate your yoga practice. Whether you’re a beginner or an advanced yogi, this pose offers endless opportunities for growth and transformation. At SportiveLives.com, we not only offer premium yoga props to support your practice but also share a wide range of yoga knowledge and pose tutorials to help you deepen your journey.
Image Copyright Notice:
Images used in this blog are intended for educational purposes and to assist in the correct practice of the postures described. For any copyright concerns, please reach out to us directly.
Article Source: www.sportivelives.com


Leave a comment
All comments are moderated before being published.